Building a Smart Garden Monitoring System with Raspberry PI and ESP8266 (NodeMCu)
In this tutorial, we are going to build a fully customized, offline IoT network from scratch. This project combines a Raspberry Pi Command Center with a NodeMCU (ESP8266) Edge Node.
The Pi acts as a local web server, a database, and an automated DJ—triggering an audio track to play over a Bluetooth speaker at scheduled intervals. Meanwhile, the ESP8266 monitors plant environment data (temperature, humidity, and soil voltage), reports back to the Pi, and dynamically manages its own deep-sleep cycles to preserve battery life based on whether the audio is playing.
What You Will Need
- Raspberry Pi (Any model with Wi-Fi and Bluetooth, running Raspberry Pi OS)
- Bluetooth Speaker or Headset
- 1x MP3 Audio File (e.g.,
audio_track.mp3)
The Edge Node (Plant Monitor):
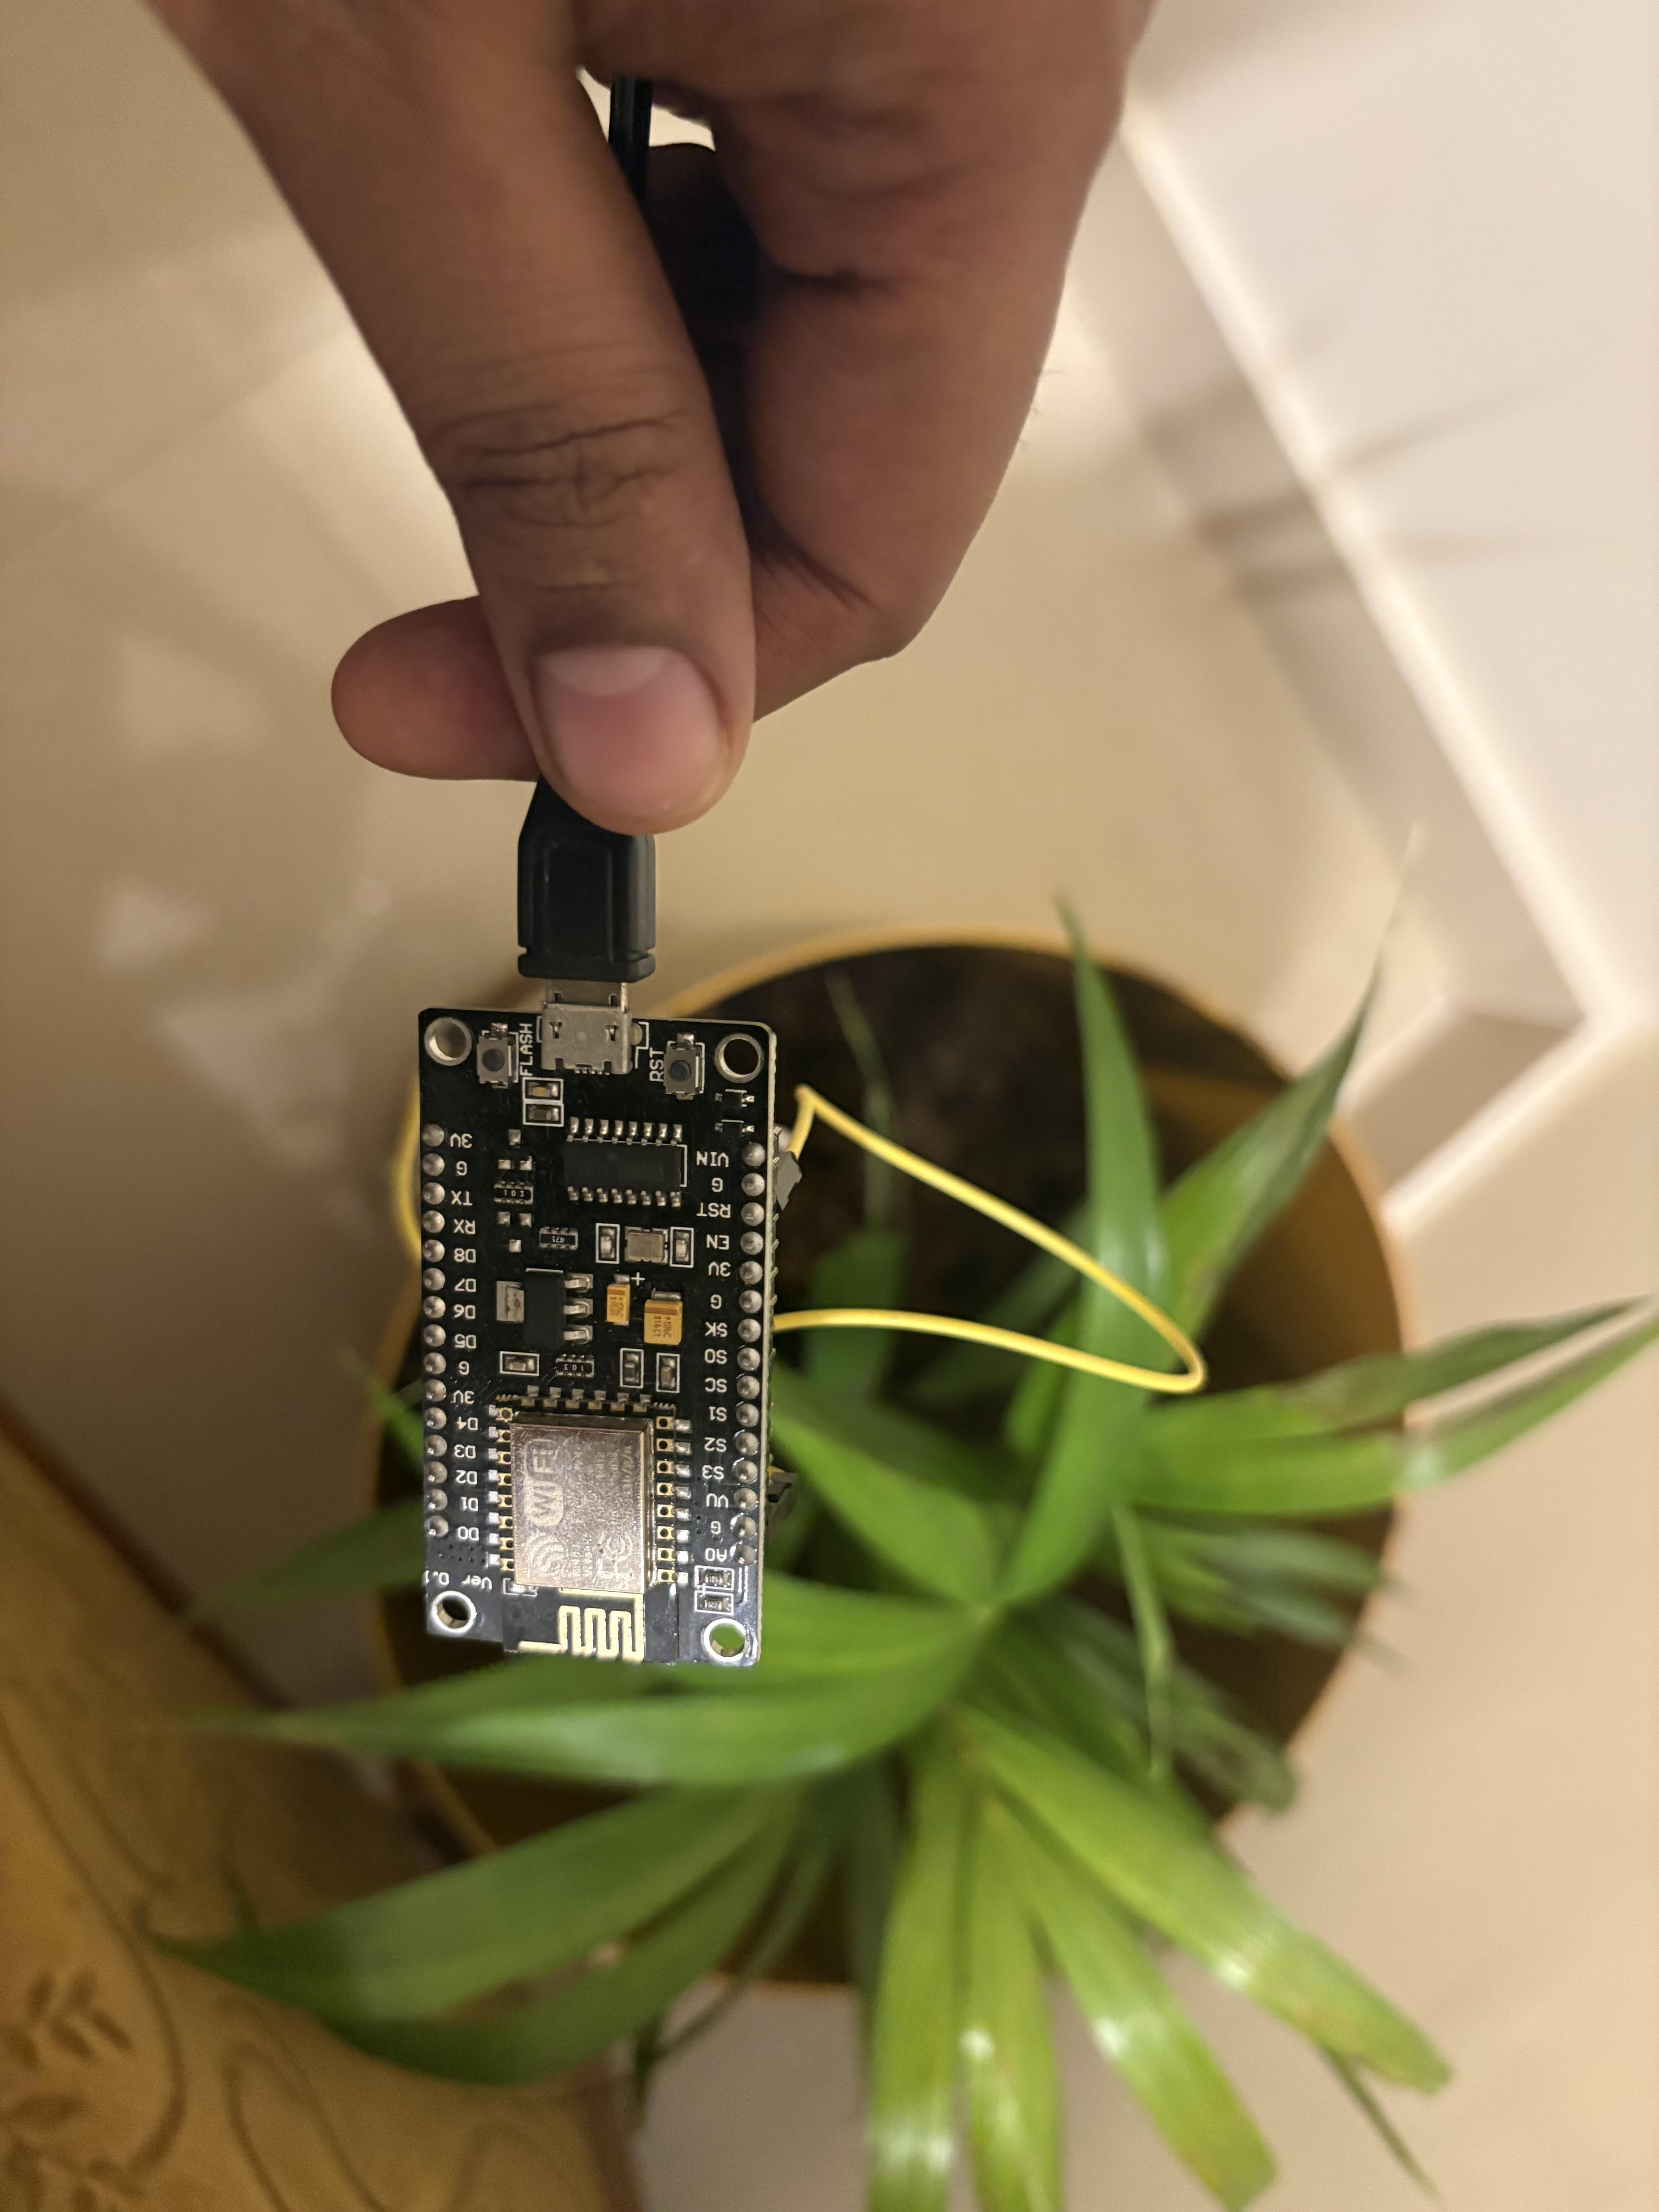
- NodeMCU (ESP8266) Microcontroller
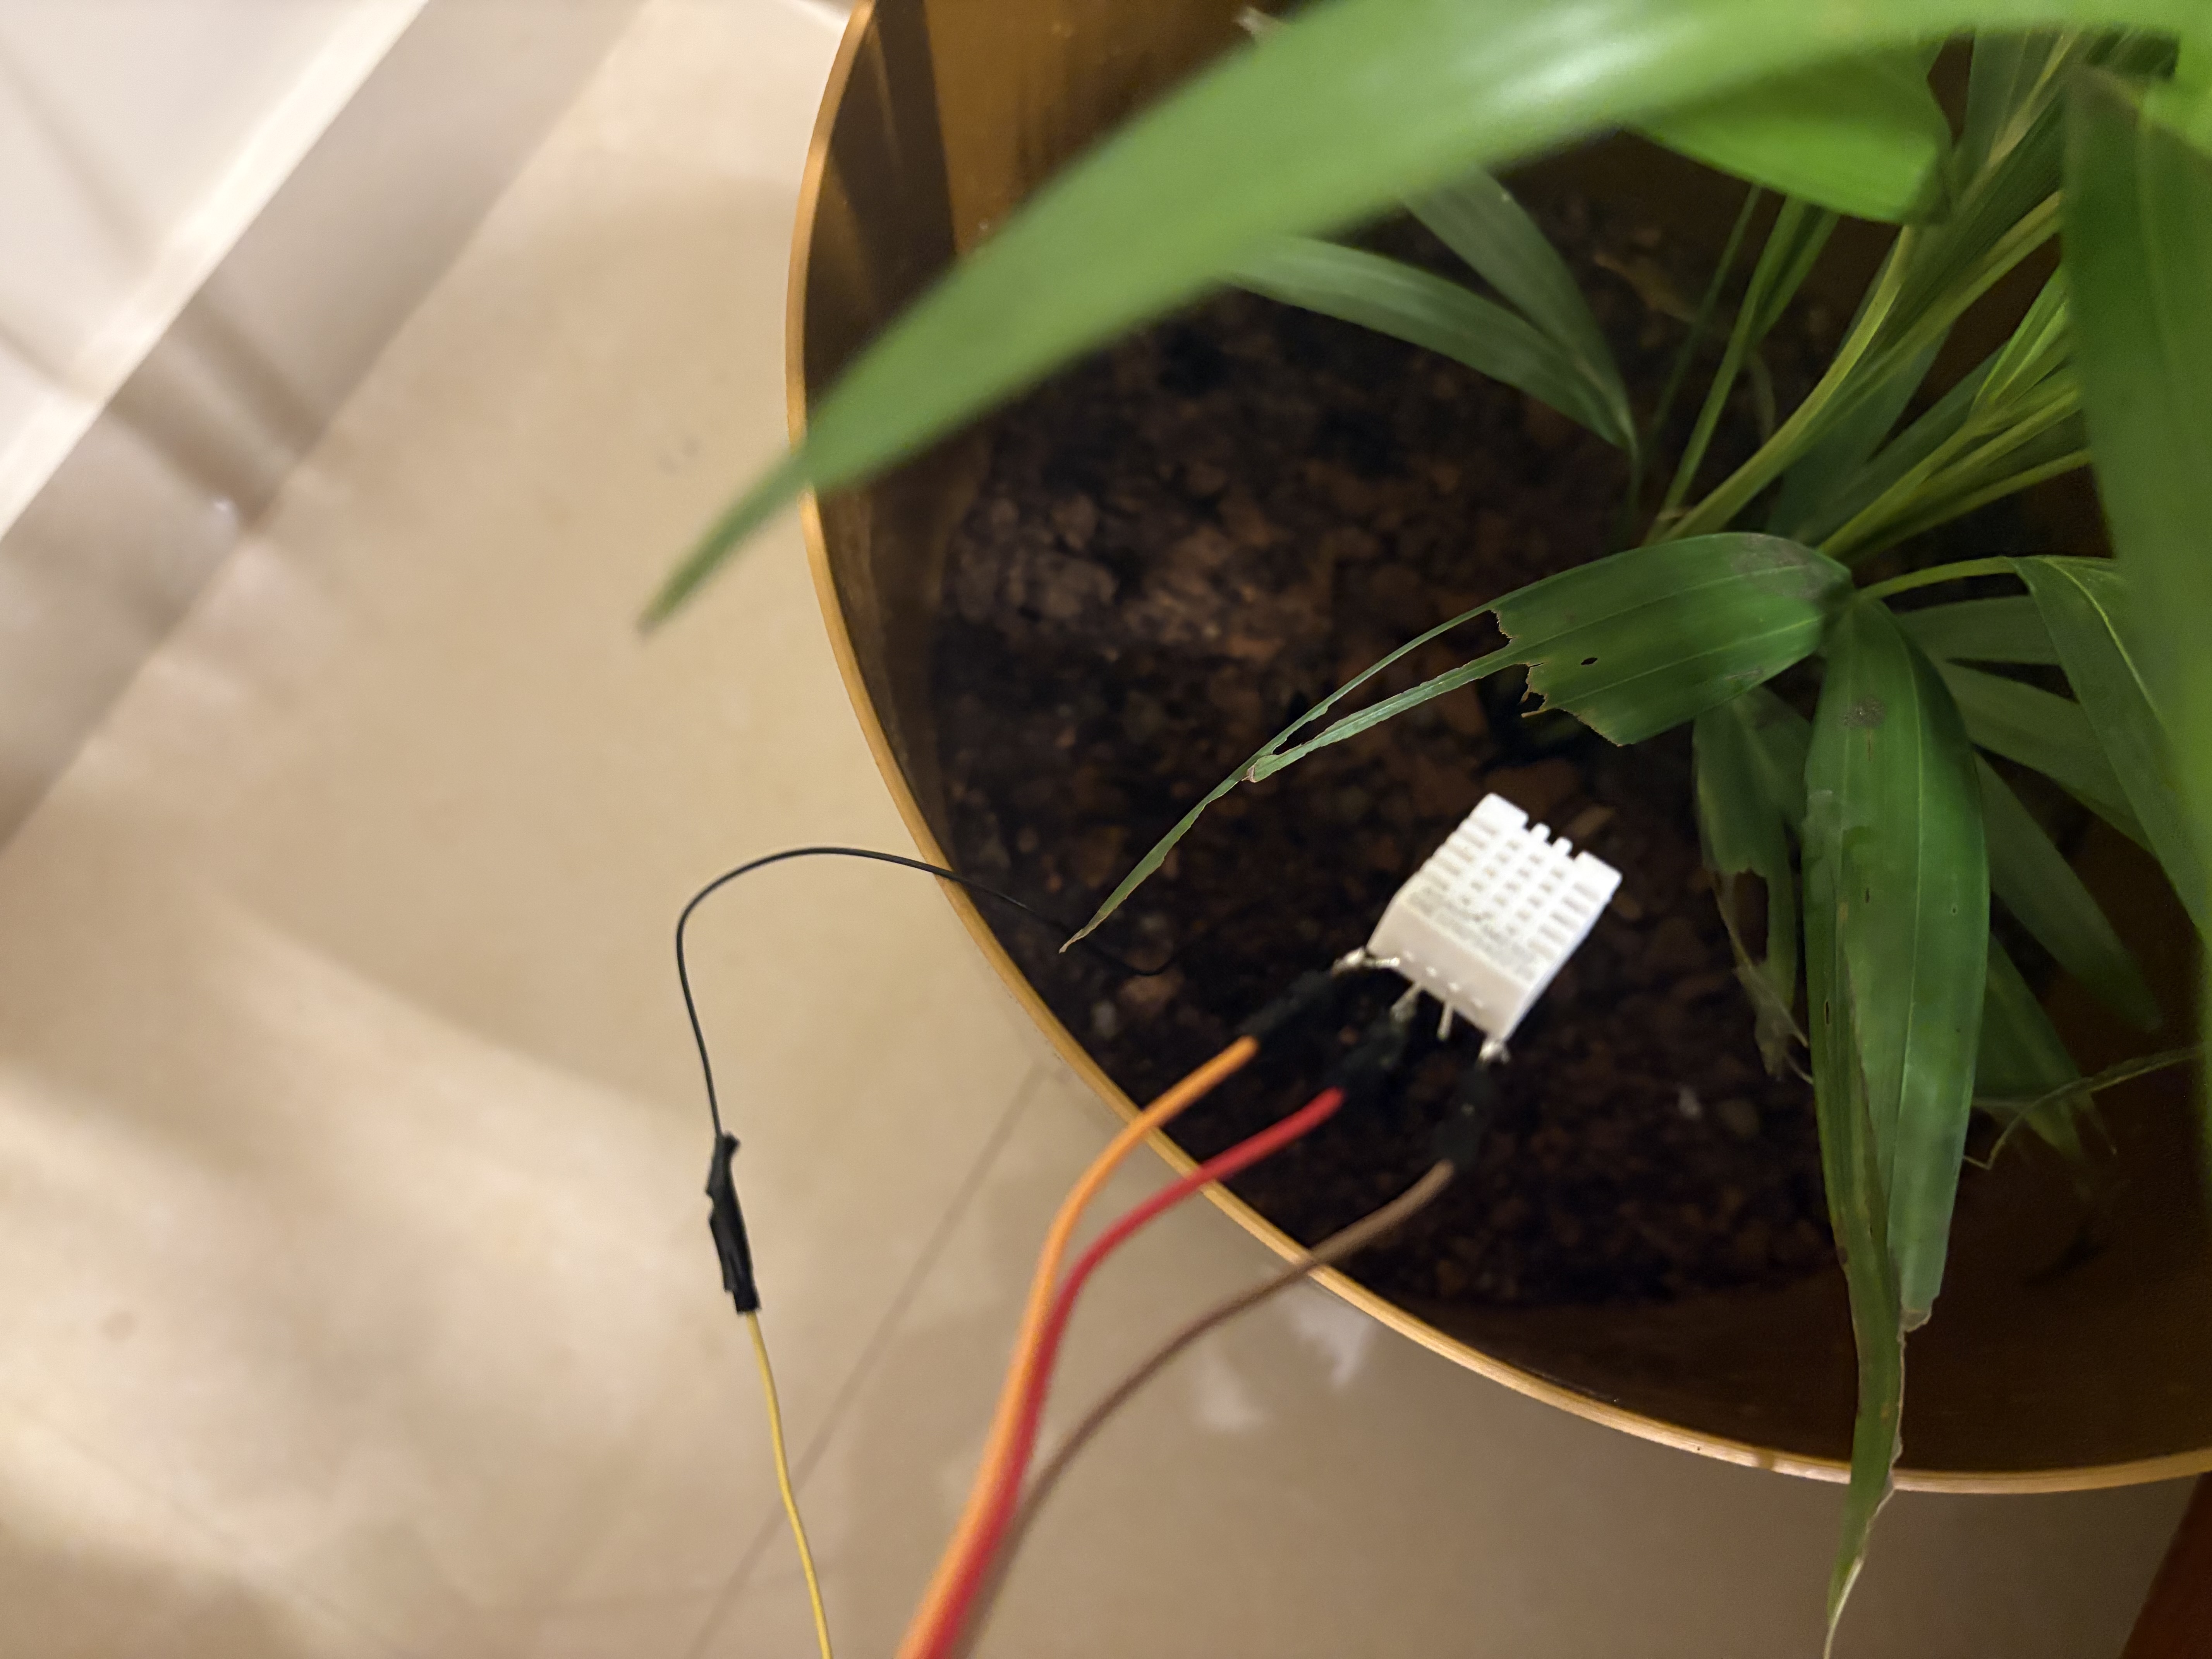
- DHT22 Sensor (For Temperature & Humidity)
- DIY Soil Probe (A piece of exposed pencil graphite attached to a jumper wire)
- Jumper Wires * Power Source: A USB Power Bank OR a battery holder with 3x/4x standard AA batteries.
Phase 1: Configuring the Audio & Bluetooth Bridge
Before writing any code, we must configure the Raspberry Pi's Linux audio system to maintain a headless, stable connection to a Bluetooth speaker.
1. Install System Dependencies Open your Raspberry Pi terminal and install the required audio and Python tools:
sudo apt update && sudo apt upgrade -y
sudo apt install pulseaudio pulseaudio-module-bluetooth mpg123 python3-pip python3-venv tmux -y
2. Pair Your Bluetooth Speaker Ensure your Bluetooth device is in pairing mode, then unblock the Pi's radio and connect:
sudo rfkill unblock bluetooth
sudo systemctl restart bluetooth
bluetoothctl
Inside the bluetoothctl prompt, run:
power on
agent on
default-agent
scan on
# Find your device's MAC Address (e.g., 1A:2B:3C:4D:5E:6F)
pair [YOUR_MAC_ADDRESS]
trust [YOUR_MAC_ADDRESS]
connect [YOUR_MAC_ADDRESS]
quit

3. Lock PulseAudio Force PulseAudio to stay alive in the background:
pulseaudio -k
pulseaudio -D --exit-idle-time=-1
4. Route Audio to Bluetooth Create a hidden configuration file to force standard Python audio out to the Bluetooth stream:
nano ~/.asoundrc
Paste this inside, save, and exit:
pcm.!default { type pulse }
ctl.!default { type pulse }
Phase 2: Raspberry Pi Code (Python)
We will create a Python virtual environment to house our Flask web server, SQLite database, and Pygame audio engine.
mkdir -p ~/smart_greenhouse
cd ~/smart_greenhouse
python3 -m venv venv
source venv/bin/activate
pip install flask apscheduler pygame
Create the main execution script:
nano main.py
Paste the following code. This script initializes the database, schedules audio playback, and creates an API endpoint to receive data from the ESP8266.
import os, sqlite3, logging
from datetime import datetime
from flask import Flask, request, jsonify, render_template
from apscheduler.schedulers.background import BackgroundScheduler

os.environ['PYGAME_HIDE_SUPPORT_PROMPT'] = "hide"
import pygame

log = logging.getLogger('werkzeug')
log.setLevel(logging.ERROR)

app = Flask(__name__)
DB_FILE = "sensor_net.db"
TRACK_FILE = "audio_track.mp3" # Ensure this file is in your directory

def init_database():
    conn = sqlite3.connect(DB_FILE)
    cursor = conn.cursor()
    cursor.execute("""
        CREATE TABLE IF NOT EXISTS sensor_logs (
            id INTEGER PRIMARY KEY AUTOINCREMENT,
            timestamp TEXT, temperature REAL, humidity REAL,
            voltage REAL, music_status TEXT
        )
    """)
    conn.commit()
    conn.close()

def play_scheduled_audio():
    if os.path.exists(TRACK_FILE):
        try:
            pygame.mixer.music.load(TRACK_FILE)
            pygame.mixer.music.play()
        except Exception as e:
            print(f"[AUDIO ERROR] {e}")

pygame.mixer.init()
init_database()

# --- WEB ROUTES ---
@app.route('/')
def dashboard():
    return render_template('dashboard.html')

@app.route('/api/latest')
def get_latest_data():
    conn = sqlite3.connect(DB_FILE)
    cursor = conn.cursor()
    cursor.execute("SELECT timestamp, temperature, humidity, voltage, music_status FROM sensor_logs ORDER BY id DESC LIMIT 1")
    row = cursor.fetchone()
    conn.close()
    if row:
        return jsonify({"timestamp": row[0], "temperature": row[1], "humidity": row[2], "voltage": row[3], "music_status": row[4]})
    return jsonify({"error": "No data yet"})

@app.route('/api/history')
def get_history():
    conn = sqlite3.connect(DB_FILE)
    cursor = conn.cursor()
    cursor.execute("SELECT timestamp, temperature, humidity, voltage FROM sensor_logs ORDER BY id DESC LIMIT 30")
    rows = cursor.fetchall()
    conn.close()
    rows.reverse()
    return jsonify({
        "labels": [row[0].split(" ")[1] for row in rows],
        "temperature": [row[1] for row in rows],
        "humidity": [row[2] for row in rows],
        "voltage": [row[3] for row in rows]
    })

@app.route('/data', methods=['POST'])
def receive_data():
    data = request.get_json()
    temp, hum, volt = data.get('temperature'), data.get('humidity'), data.get('voltage')
    timestamp = datetime.now().strftime("%Y-%m-%d %H:%M:%S")

    is_music_playing = pygame.mixer.music.get_busy()
    music_status = "PLAYING" if is_music_playing else "SILENT"

    conn = sqlite3.connect(DB_FILE)
    cursor = conn.cursor()
    cursor.execute("INSERT INTO sensor_logs (timestamp, temperature, humidity, voltage, music_status) VALUES (?, ?, ?, ?, ?)",
                   (timestamp, temp, hum, volt, music_status))
    conn.commit()
    conn.close()

    # Dynamic Sleep Logic: Stay awake if audio is playing.
    if is_music_playing:
        return jsonify({"command": "STAY_AWAKE", "sleep_time": 10})
    return jsonify({"command": "SLEEP", "sleep_time": 1800}) # 30 mins

if __name__ == '__main__':
    scheduler = BackgroundScheduler()
    scheduler.add_job(play_scheduled_audio, 'cron', hour='6-18', minute=0)
    scheduler.start()
    app.run(host='0.0.0.0', port=5000)
Phase 3: The Dashboard UI
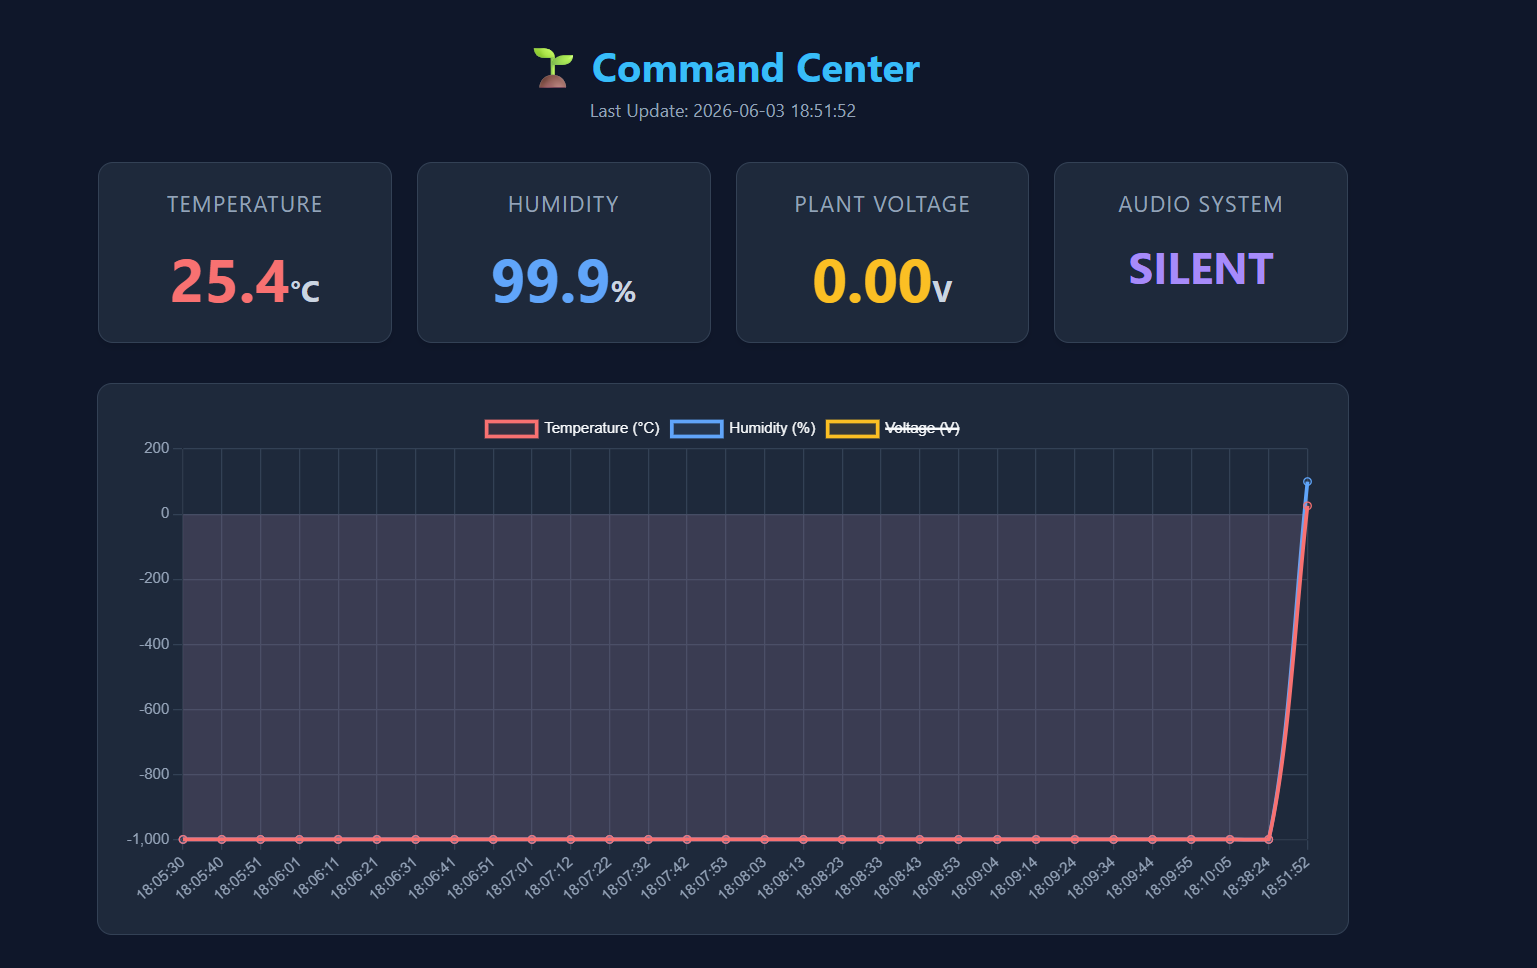
Flask needs an HTML file to render the beautiful dark-mode frontend.
mkdir templates
nano templates/dashboard.html
Paste this HTML code, which utilizes Chart.js for live data graphing:
<!DOCTYPE html>
<html lang="en">
<head>
    <title>Greenhouse Command Center</title>
    <script src="https://cdn.jsdelivr.net/npm/chart.js"></script>
    <style>
        body { background: #0f172a; color: #f8fafc; font-family: sans-serif; padding: 2rem; display: flex; flex-direction: column; align-items: center; }
        .grid { display: grid; grid-template-columns: repeat(auto-fit, minmax(220px, 1fr)); gap: 20px; width: 100%; max-width: 1000px; margin-bottom: 2rem; }
        .card { background: #1e293b; border-radius: 12px; padding: 20px; border: 1px solid #334155; text-align: center; }
        .card-value { font-size: 3rem; font-weight: bold; }
        .chart-container { background: #1e293b; border-radius: 12px; padding: 20px; width: 100%; max-width: 960px; height: 400px; }
    </style>
</head>
<body>
    <h1 style="color: #38bdf8;">🌱 Garden Reading Monitor</h1>
    <div id="timestamp" style="color:#94a3b8; margin-bottom: 2rem;">Waiting for data...</div>

    <div class="grid">
        <div class="card"><div style="color:#94a3b8;">Temperature</div><div class="card-value" style="color:#f87171;" id="temp">--</div></div>
        <div class="card"><div style="color:#94a3b8;">Humidity</div><div class="card-value" style="color:#60a5fa;" id="hum">--</div></div>
        <div class="card"><div style="color:#94a3b8;">Voltage</div><div class="card-value" style="color:#fbbf24;" id="volt">--</div></div>
        <div class="card"><div style="color:#94a3b8;">Audio Status</div><div class="card-value" style="color:#a78bfa;" id="music">--</div></div>
    </div>

    <div class="chart-container"><canvas id="trendChart"></canvas></div>

    <script>
        const ctx = document.getElementById('trendChart').getContext('2d');
        const trendChart = new Chart(ctx, {
            type: 'line',
            data: { labels: [], datasets: [
                { label: 'Temp', borderColor: '#f87171', data: [] },
                { label: 'Hum', borderColor: '#60a5fa', data: [] }
            ]},
            options: { responsive: true, maintainAspectRatio: false }
        });

        function fetchData() {
            fetch('/api/latest').then(r => r.json()).then(d => {
                if(!d.error) {
                    document.getElementById('temp').innerText = d.temperature.toFixed(1) + '°C';
                    document.getElementById('hum').innerText = d.humidity.toFixed(1) + '%';
                    document.getElementById('volt').innerText = d.voltage.toFixed(2) + 'V';
                    document.getElementById('music').innerText = d.music_status;
                    document.getElementById('timestamp').innerText = "Last Update: " + d.timestamp;
                }
            });
            fetch('/api/history').then(r => r.json()).then(d => {
                if(!d.error) {
                    trendChart.data.labels = d.labels;
                    trendChart.data.datasets[0].data = d.temperature;
                    trendChart.data.datasets[1].data = d.humidity;
                    trendChart.update();
                }
            });
        }
        setInterval(fetchData, 5000); fetchData();
    </script>
</body>
</html>
Phase 4: The Edge Node (ESP8266)
Wire your hardware:
- DHT22: Data pin to
D2. - Soil Probe (Graphite): Wire to
A0. (This acts as an antenna/voltage reader). - Deep Sleep Link: Connect
D0toRSTwith a jumper wire. - Power: Connect your 4.5V battery pack or USB Power Bank.
Upload this C++ code via the Arduino IDE. (Note: This includes a "Heartbeat Hack" that briefly wakes the Wi-Fi radio every 25 seconds to prevent smart USB power banks from automatically shutting off).
#include <ESP8266WiFi.h>
#include <ESP8266HTTPClient.h>
#include <ArduinoJson.h>
#include "DHT.h"

#define DHTPIN D2
#define DHTTYPE DHT22

const char* ssid = "YOUR_WIFI_SSID";
const char* password = "YOUR_WIFI_PASSWORD";
const char* piEndpoint = "http://YOUR_PI_IP_ADDRESS:5000/data";

DHT dht(DHTPIN, DHTTYPE);
WiFiClient client;
uint32_t rtcData;

void setup() {
  Serial.begin(115200);
  ESP.rtcUserMemoryRead(0, &rtcData, sizeof(rtcData));

  // Report every 72 cycles (approx 30 mins)
  if (rtcData >= 72 || rtcData > 1000) {
    rtcData = 0;
    ESP.rtcUserMemoryWrite(0, &rtcData, sizeof(rtcData));

    dht.begin();
    WiFi.begin(ssid, password);
    while (WiFi.status() != WL_CONNECTED) { delay(500); }

    float hum = dht.readHumidity();
    float temp = dht.readTemperature();
    float volt = (analogRead(A0) / 1023.0) * 3.3;

    StaticJsonDocument<200> doc;
    doc["temperature"] = isnan(temp) ? -99.0 : temp;
    doc["humidity"] = isnan(hum) ? -99.0 : hum;
    doc["voltage"] = volt;
    String jsonPayload;
    serializeJson(doc, jsonPayload);

    HTTPClient http;
    http.begin(client, piEndpoint);
    http.addHeader("Content-Type", "application/json");
    int resp = http.POST(jsonPayload);

    String command = "SLEEP";
    if (resp == 200) {
      StaticJsonDocument<200> responseDoc;
      deserializeJson(responseDoc, http.getString());
      command = String(responseDoc["command"] | "SLEEP");
    }
    http.end();

    while (command == "STAY_AWAKE") {
      delay(10000);
      // Add a loop here to re-post data if required during active sessions
    }
  } else {
    // Heartbeat hack for Smart Power Banks
    WiFi.forceSleepWake();
    delay(100);
    rtcData++;
    ESP.rtcUserMemoryWrite(0, &rtcData, sizeof(rtcData));
  }

  ESP.deepSleep(25 * 1000000ULL); // Sleep for 25 seconds
}
void loop() {}
Phase 5: Deployment
To ensure your Command Center survives reboots and doesn't die when you close your SSH terminal, create an ignition script.
nano ~/smart_greenhouse/ignition.sh
Paste the following, updating the paths and MAC address:
#!/bin/bash
sleep 15
pulseaudio -k
pulseaudio -D --exit-idle-time=-1
bluetoothctl connect [YOUR_MAC_ADDRESS]
sleep 5
cd /home/YOUR_USERNAME/smart_greenhouse
tmux new-session -d -s vault 'source venv/bin/activate && python3 main.py'
Make it executable and add it to your crontab:
chmod +x ~/smart_greenhouse/ignition.sh
crontab -e
Add this line to the bottom:
@reboot /home/YOUR_USERNAME/smart_greenhouse/ignition.sh > /home/YOUR_USERNAME/smart_greenhouse/boot_log.txt 2>&1
You're Done! Place the ESP8266 node in your plant pot. Your Raspberry Pi will now run silently in the background, plotting live environmental data, managing your device's power lifecycle, and playing scheduled audio completely automatically.